


instruNet-to-Origin Widget
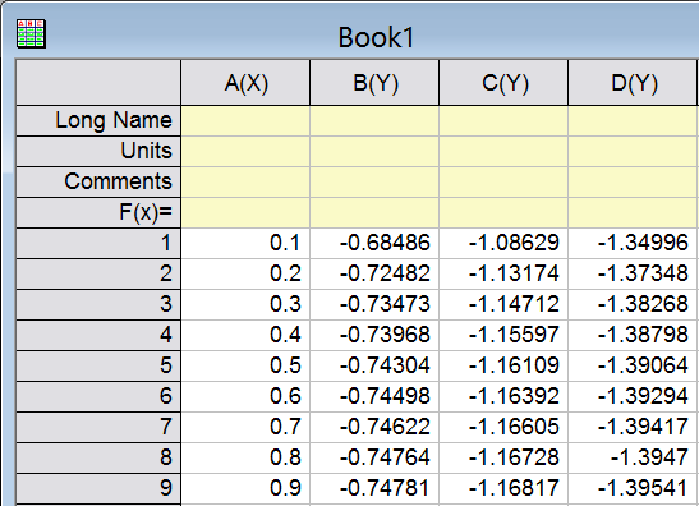
The instruNet-to-Origin Widget populates an OriginLabs Corporation Origin spreadsheet while digitizing in realtime, as pictured to the right.
Installation
- In order to run the instruNet-to-Origin widget, all of the following must be installed on your computer. If you are not sure these requirements have been satisfied, try running the widget, as described below, and if it runs ok, you are probably ok.
- Origin V 8.6+
- Windows 7+ (64 bit)
- instruNet V3.6+
This will install a 64bit native version of "windows/system32/iNet32.dll", which will talk to Origin. - Download the Origin "instruNet_to_Origin.opx" file and place it onto the Windows desktop. Run Origin software and wait for it's window to open. Drag the "instruNet_to_Origin.opx" file onto the Origin window to permanently install this widget into Origin. An alert will appear that states "The package has been installed". Also, a toolbar with one button named "iNet" will appear in the Origin window. Drag this to the side of the window to dock it, as shown to the right.
- Simulation
If instruNet hardware is not connected to this computer and you want to simulate an instruNet i555 hardware device (where you receive random numbers instead of real a/d values), changed file name "...Documents\ instruNet\ End User\ iNet32 Demo Off.txt" to "...iNet32 Demo On.txt". If you want to later disable simulation, rename the file back to "..Off". Simulation still requires instruNet software to be installed on the computer, which one can do for free via instruNet download.
Tutorial
- Quit application software that might be operating instruNet, run Origin, and click the "iNet" button. This will run the widget, as pictured below.

- Press Channels to configure channels and to enable them for digitizing. To enable a channel for digitizing, click to make rectangle red, as shown above and described here. After setting up your channels, close the Network window by clicking it's upper-right close box.

- Press Setup to set samples-per-second-per-channel and number-of-points-digitized-per-channel. Typically, one sets Number-of-Scans to 1.
- PressSave to save the setup. Everything you did in the Channels and Setup areas is saved in a .prf file. Make sure you don't save to the Program Files folder, since this is a protected area.
- Next time you run this software, you must press Load to load back your settings.
- PressStart to start digitizing, and Stop to stop it.
- For more details on how to use this widget, press Help.
- Press the Channels button, select 2 channels for digitizing (i.e. click in small rectangle to right of blue Quick Setup button, it will turn red), and close the instruNet Network window via upper-right close box.
- Press the Start button and watch a new spreadsheet window appear and fill with instruNet data, as shown in the picture at the top of this webpage. When finished, you can save or delete the spreadsheet file.
- Close the instruNet widget by clicking in the upper-right corner of the widget window. One can re-open by clicking the "iNet" button.
In summary:
Help and Support
Help and Support for the instruNet-to-Origin-Widget is available only with ADDITIVE Professional Service.