
")


Improved Handling of Empty Cells in Origin 2019
Starting with Origin 2019, how empty worksheet cells are handled has been improved. The improvements were made in order to provide a cleaner-looking worksheet when the data has gaps in various places. The improvements also allow for easier visual determination of where data begins and ends in columns.
Before discussing the changes, let's introduce the two types of "empty" cells:
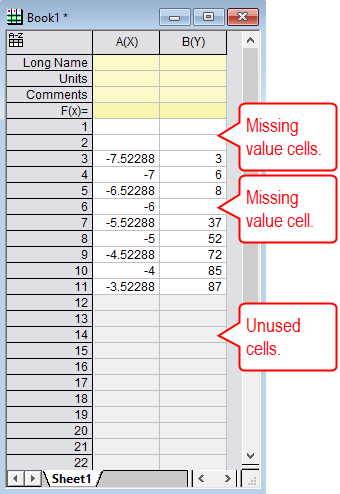
- Missing value cells: These are cells whose value is set to NANUM (Not A Number). They used to typically display the "missing value symbol" (- -). Starting with Origin 2019, they are visually empty but, behind the scenes, they have that value.
- Unused cells: These are cells that do not have any value, even NANUM. Typically, they are cells at the end of a column of data.
The first change is that, like cells with actual values, missing value cells will have a white background by default. Unused cells, however, will have a shaded background, allowing you to differentiate which blank cells are missing values and which are unused. (Note: To modify this shading behavior, see Modifying Cell Shading Behavior below.)
The second change is about how empty cells are treated when either entering or pasting data into an empty column starting on a row after the first row. In older Origin versions, the preceding cells in the column were left as unused. This meant that, if included in data selection, they were not counted in most plots and analyses. Starting with Origin 2019, those empty preceding cells are treated as missing value cells for most plotting and analyses. This change means that if you do not want them to be included, you will need to deliberately exclude them from data selection or follow Hint #4 below.
Some Handy Hints
- Adding a value to a cell beyond the end of column data will fill the cell gap with missing values. You can't have unused cells in the middle of a column of data.
- Clearing cells at the beginning or in the middle of a column of data converts the cells to missing values.
- Clearing cells at the end of a column of data converts the cells to unused.
- To convert missing values at the beginning of a column to unused, select the first cell in the column that actually contains data, right-click and choose 'Set as Begin' from the context menu.
- To force the display of the missing value symbol (- -) in a certain cell, select the cell (or cells) and hit Ctrl + Delete on the keyboard.
- The Delete key has different behavior than the Delete context menu item. The Delete key simply clears the contents of the cell, while the context menu item actually deletes the cell itself, moving later cells up. If there is only one cell with a value in the column, the Delete key will set the entire column to be unused.
Modifying Cell Shading Behavior
The display of cell shading for unused cells is controlled at the workbook level. It can be toggled on or off in the Window Properties dialog for the workbook using the Indicate unused cells with a shaded background check box. It can also be controlled via LabTalk via the page.OUTSIDERANGESPECPAINT property where 1 = on and 0 = off. The degree of shading can be controlled via the @COR system variable. The default value is 45. It is a "darkening factor" and the value is divided by 1000 to arrive at the percent darkening. For example 45/1000 = 0.045 or 4.5% darkened. 30 would be: 30/1000 = 0.030 or 3% darkened.